Understanding Jenkins LSTV Classifications
LSTV Lumbosacral transitional Vertebra was first classfied into 4 types in 1984 by Antonio E. Castellvi (Castellvi et al., 1984). The main purpose was to describe the appearance of the anatomy on imaging. It was primarily for describing the size of the transverse process and for adjacent disc herniations and whether there was a fusion or not in a very standard way. It was not written to treat pain or actually determine if the LSTV was causing pain and did not consider symptoms.
Arthur L Jenkins III and his team have revised these classifications to guide diagnosis and treatment of Bertolotti syndrome (BSy) for a primary focus on pain source, symptoms, and treatment planning based on Type of transitional anatomy and likely response to treatment and also designed to help identify clinically significant pain generators.
The newer classification is specifically intended to help determine appropriate treatment and surgical pathways. It is designed to connect the LSTV anatomy to clinical decision making.
The Jenkins Classification(Jenkins, O’Donnell, et al., 2023) is about how the transitional anatomy is affecting the patient and what treatment may help. It is designed specifically for treatment of symptomatic LSTV Bertolotti Sydrome (BSy) and provides a framework to guide management decisions, including injections, resection, or fusion when appropriate.
Another problem that often comes up with patients having LSTVs is that the count of lumbar vertebrae might not be the classic “5.” Depending on how one defines the “L1” level as opposed to the “T12” level, the existence of transitional ribs, and what makes the bottom lumbar level, a patient could have 4, 5, or 6 lumbar vertebrae. These changes in levels are very important to treatments going forward.
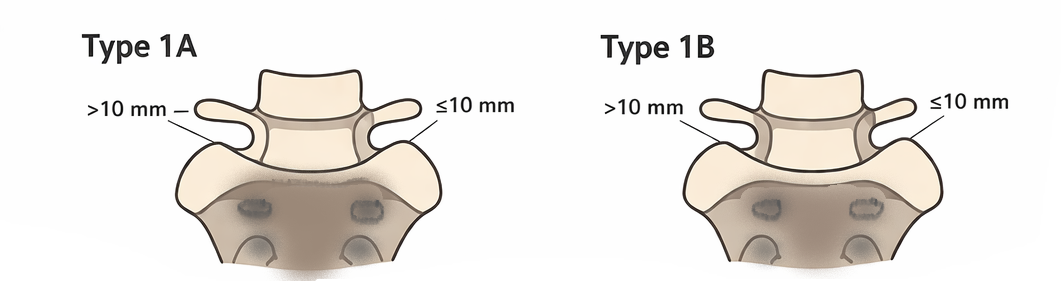
Type 1A (Left or Right)
One side has an enlarged transverse process that extends closer to the sacrum than normal, leaving a gap of less than 10 mm. The opposite side remains separated by more than 10 mm.
Type 1B
Both transverse processes are hypertrophic and are located within 10 mm from the sacrum. One side may be closer than the other.
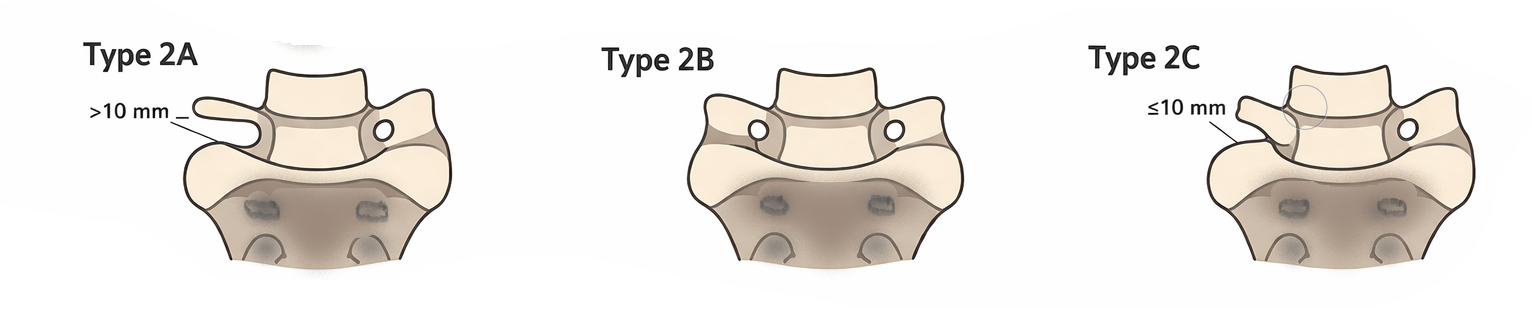
Type 2A (Left or Right)
Incomplete lumbarisation or Sacralisation. An enlarged transverse process on one side forms a small movable joint (pseudoarticulation) with the sacrum. The space between the two bones is very narrow, usually less than 2 mm. The opposite side remains separated by more than 10 mm.
Type 2B
Both enlarged transverse processes form pseudoarticulations with the sacrum. A small joint space remains present on each side, although one side may be larger or more developed than the other. (Incomplete Bilateral lumbarisation or sacralisation)
Type 2C (Left or Right)
One side has an enlarged transverse process that approaches the sacrum but does not form a joint (Type 1 appearance), while the opposite side forms a pseudoarticulation with the sacrum (Type 2 appearance). (An incomplete lumbarisation or sacralisation on one side).
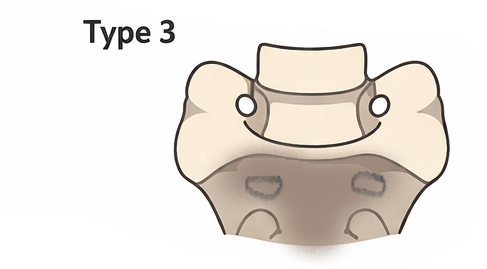
Type 3
The enlarged transverse processes are completely fused to the sacrum on both sides. (Bilateral Lumbarisation or sacralisation) No visible joint space can be identified on imaging studies. Type 3 can still have pain despite being fully fused. This may occur if the patient has developed other spinal conditions such as spondylolisthesis.
Type 4A (Left or Right)
One side shows complete bony fusion between the transverse process and sacrum, while the opposite side has an enlarged transverse process that remains close to the sacrum without forming a joint. Type 3 on one side and type 1 on the other. (Lumbarisaton or sacralisation).
Type 4B (Left or Right)
Lumbarisation or sacralisation. One side is completely fused to the sacrum, while the opposite side forms a pseudoarticulation with a small remaining joint space. Type 3 on one side and type 2 on the other.
Type 4C (Left or Right)
Lumbarisation or sacralisation. One side demonstrates complete bony fusion to the sacrum, while the opposite side has no significant contact and remains separated by more than 10 mm. Type 3 on one side and type 1 on the other side.
Understanding Left or Right or Both.
This modifier/Label indicates contact between the transverse process and the iliac crest:
+L = contact occurs on the left side. example 4AL equals type 1 is open on right; type 3 on left
+R = contact occurs on the right side.
+B = contact occurs on both sides.
You can also have secondary contact for example 2C L + L this means that both sides may have contact with the Iliac crest. Type 2 would be very close and have contact, and then type 1 on the other side is also close and have contact with the iliac crest
or simply
Type 2A (L)+B
│ │ │
│ │ └── Iliac crest contact on both sides
│ └────── Left side anatomy
└───────────── Transitional vertebra subtype.
For reference to this latest research paper please visit the link here.